Too many tweets!

Accessing proxy services in WSO2 ESB with a security token issued by the Identity Server 2.0

This post explains how we can access a proxy service deployed in WSO2 ESB with a security token issued by the Identity Server 2.0.

This is the use case;

1. User authenticates to the Identity Server 2.0
2. User gets a Security Token from the Identity Server 2.0 - which is signed by the Identity Server's private key and encrypted by the ESB's public key.
3. User provides the security token to the ESB to access the proxy service.

Lets create the proxy service first - you simply need to copy and paste following Synapse configuration [in WSO2 ESB] - it's a simple proxy service having a Send mediator in In/Out sequences.
<?xml version="1.0" encoding="UTF-8"?>
<syn:definitions xmlns:syn="http://ws.apache.org/ns/synapse">
<syn:registry provider="org.wso2.carbon.mediation.registry.WSO2Registry">
<syn:parameter name="cachableDuration">15000</syn:parameter>
</syn:registry>
<syn:proxy name="test" transports="https http" startOnLoad="true" trace="disable">
<syn:target>
<syn:inSequence>
<syn:send/>
</syn:inSequence>
<syn:outSequence>
<syn:send/>
</syn:outSequence>
</syn:target>
</syn:proxy>
<syn:sequence name="main">
<syn:in>
<syn:log level="full"/>
<syn:filter source="get-property('To')" regex="http://localhost:9000.*">
<syn:send/>
</syn:filter>
</syn:in>
<syn:out>
<syn:send/>
</syn:out>
</syn:sequence>
<syn:sequence name="fault">
<syn:log/>
</syn:sequence>
</syn:definitions>
Now, we need to apply security to the proxy service.

Lets select 'test' [the proxy service which we just created] from the service listing page and select 'Security' from the Service Dashboard.

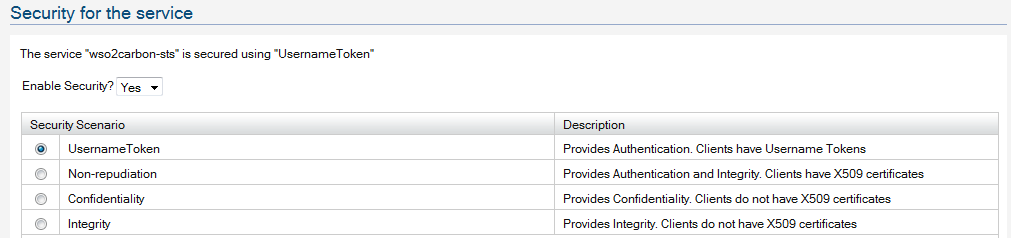
Now, apply "Sign and encrypt - X509 Authentication" security policy and during the wizard select wso2carbon.jks as the trust store.

Once applied the security policy - we need to modify this to consume a security token issued by the Identity Server 2.0 STS.

From the Service Dashboard of the 'test' proxy service, select 'Policies'.

Let's get the policy to override, from service.policy.xml available here.

Click on "Edit Policy" at "Service Hierarchy\Service test" and clear the content there to copy & paste the content from service.policy.xml and Save.

Now we are done - our proxy service is secured - Sign & Encrypt and accepts a security token issued by the Identity Server STS.

Since, the token issued by the Identity Server 2.0 is signed by it's private key - ESB should have it's public key to verify. In default setup - ESB's trust key store includes the public certificate of the Identity Server - so, nothing to be done here with the default setup.

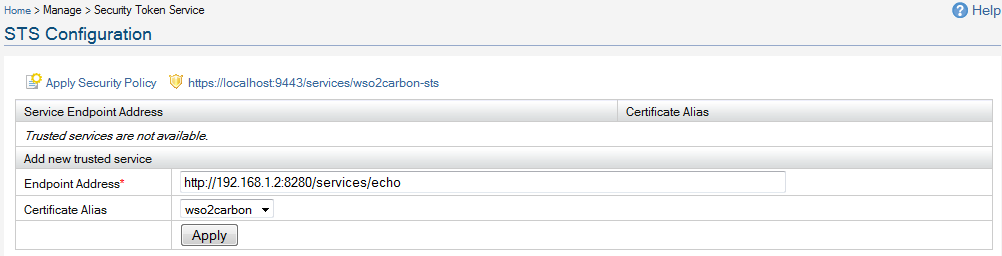
Now - we need to setup Identity Server STS to issue tokens.

As the first step - you need to upload the public certificate of the ESB to the Identity Server's trust key store - since IS uses it to encrypt the security token issued.

You can get the public certificate [wso2carbon.cert.cer] of the ESB from here.

Login to IS as an admin, and import the above certificate to wso2carbon.jks from Configure/Key Stores. [Yes - WSO2 ESB and IS use two different key stores - that's why we need to perform this step here]

The first part of this explains all the steps you need to setup IS STS.

Make sure, in the first step - while adding the trusted 'Endpoint Address' - select 'wso2carbon.cert' as the 'Certificate Alias'.

That's it - now let's write the client code.

You may also need to download Java Cryptography Extension (JCE) Unlimited Strength Jurisdiction Policy Files 5.0 from here and copy the two jar files from the extracted jce directory (local_policy.jar and US_export_policy.jar) to $JAVA_HOME/jre/lib/security. For JDK 6 it's here.

Also while running the client code, make sure bouncycastle jar is in the classpath.

You can download both sts.policy.xml and service.policy.xml files from here.
package org.apache.ws.axis2;

import java.util.Properties;

import org.apache.axiom.om.OMAbstractFactory;
import org.apache.axiom.om.OMElement;
import org.apache.axiom.om.OMFactory;
import org.apache.axiom.om.OMNamespace;
import org.apache.axiom.om.impl.builder.StAXOMBuilder;
import org.apache.axis2.addressing.EndpointReference;
import org.apache.axis2.client.Options;
import org.apache.axis2.client.ServiceClient;
import org.apache.axis2.context.ConfigurationContext;
import org.apache.axis2.context.ConfigurationContextFactory;
import org.apache.neethi.Policy;
import org.apache.neethi.PolicyEngine;
import org.apache.rahas.RahasConstants;
import org.apache.rahas.Token;
import org.apache.rahas.TokenStorage;
import org.apache.rahas.TrustUtil;
import org.apache.rahas.client.STSClient;
import org.apache.rampart.RampartMessageData;
import org.apache.rampart.policy.model.RampartConfig;
import org.apache.rampart.policy.model.CryptoConfig;
import org.apache.ws.secpolicy.Constants;
import org.opensaml.XML;

public class IdentitySTSClient {

/**
* @param args
*/

final static String RELYING_PARTY_SERVICE_EPR = "http://192.168.1.2:8280/services/echo";
final static String ESB_TRANS_EPR = "http://192.168.1.2:8280/services/test";
final static String STS_EPR = "https://localhost:9443/services/wso2carbon-sts";

/**
* @param args
* @throws Exception
*/
public static void main(String[] args) throws Exception {
ConfigurationContext confContext = null;
Policy stsPolicy = null;
STSClient stsClient = null;
Policy servicePolicy = null;
Token responseToken = null;
String trustStore = null;

// You need to import the Identity Server, public certificate to this key store.
// By default it's there - if you use wso2carbon.jks from [ESB_HOME]\resources\security
trustStore = "wso2carbon.jks";
// We are accessing STS over HTTPS - so need to set trustStore parameters.
System.setProperty("javax.net.ssl.trustStore", trustStore);
System.setProperty("javax.net.ssl.trustStorePassword", "wso2carbon");

// Create configuration context - you will have Rampart module engaged in the
// client.axis2.xml
confContext = ConfigurationContextFactory.createConfigurationContextFromFileSystem("repo",
"repo/conf/client.axis2.xml");

stsClient = new STSClient(confContext);

stsClient.setRstTemplate(getRSTTemplate());
stsClient.setAction(RahasConstants.WST_NS_05_02 + RahasConstants.RST_ACTION_SCT);

// This is the security policy we applied to Identity Server STS.
// You can see it by https://[IDENTITY_SERVER]/services/wso2carbon-sts?wsdl
stsPolicy = loadSTSPolicy("sts.policy.xml");

// This is the security of the relying party web service.
// This policy will accept a security token issued from Identity Server STS
servicePolicy = loadServicePolicy("service.policy.xml");

responseToken = stsClient.requestSecurityToken(servicePolicy, STS_EPR, stsPolicy,
RELYING_PARTY_SERVICE_EPR);

System.out.println(responseToken.getToken());

TokenStorage store = TrustUtil.getTokenStore(confContext);
store.add(responseToken);

ServiceClient client = new ServiceClient(confContext, null);
Options options = new Options();
options.setAction("urn:echoString");
options.setTo(new EndpointReference(RELYING_PARTY_SERVICE_EPR));
options.setProperty(org.apache.axis2.Constants.Configuration.TRANSPORT_URL, ESB_TRANS_EPR);
options.setProperty(RampartMessageData.KEY_RAMPART_POLICY,servicePolicy);
options.setProperty(RampartMessageData.KEY_CUSTOM_ISSUED_TOKEN, responseToken.getId());
client.setOptions(options);

client.engageModule("addressing");
client.engageModule("rampart");

OMElement response = client.sendReceive(getPayload("Hello world1"));
System.out.println("Response  : " + response);
}

private static Policy loadSTSPolicy(String xmlPath) throws Exception {
StAXOMBuilder builder = null;
Policy policy = null;
RampartConfig rc = null;
builder = new StAXOMBuilder(xmlPath);
policy = PolicyEngine.getPolicy(builder.getDocumentElement());
rc = new RampartConfig();
rc.setUser("admin");
// You need to have password call-back class to provide the user password
rc.setPwCbClass(PWCBHandler.class.getName());
policy.addAssertion(rc);
return policy;
}

private static Policy loadServicePolicy(String xmlPath) throws Exception {
StAXOMBuilder builder = null;
Policy policy = null;
RampartConfig rc = null;
CryptoConfig sigCryptoConfig = null;
String keystore = null;
Properties merlinProp = null;
CryptoConfig encrCryptoConfig = null;

builder = new StAXOMBuilder(xmlPath);
policy = PolicyEngine.getPolicy(builder.getDocumentElement());
rc = new RampartConfig();
rc.setUser("wso2carbon");
rc.setEncryptionUser("wso2carbon");
// You need to have password call-back class to provide the user password
rc.setPwCbClass(PWCBHandler.class.getName());  

keystore = "wso2carbon.jks";
merlinProp = new Properties();
merlinProp.put("org.apache.ws.security.crypto.merlin.keystore.type","JKS");
merlinProp.put("org.apache.ws.security.crypto.merlin.file", keystore);
merlinProp.put("org.apache.ws.security.crypto.merlin.keystore.password","wso2carbon");

sigCryptoConfig = new CryptoConfig();
sigCryptoConfig.setProvider("org.apache.ws.security.components.crypto.Merlin");
sigCryptoConfig.setProp(merlinProp);

encrCryptoConfig = new CryptoConfig();
encrCryptoConfig.setProvider("org.apache.ws.security.components.crypto.Merlin");
encrCryptoConfig.setProp(merlinProp);

rc.setSigCryptoConfig(sigCryptoConfig);
rc.setEncrCryptoConfig(encrCryptoConfig);

policy.addAssertion(rc);
return policy;
}

private static OMElement getRSTTemplate() throws Exception {
OMFactory fac = OMAbstractFactory.getOMFactory();
OMElement elem = fac.createOMElement(Constants.RST_TEMPLATE);
TrustUtil.createTokenTypeElement(RahasConstants.VERSION_05_02, elem).setText(XML.SAML_NS);
TrustUtil.createKeyTypeElement(RahasConstants.VERSION_05_02, elem,RahasConstants.KEY_TYPE_SYMM_KEY);
TrustUtil.createKeySizeElement(RahasConstants.VERSION_05_02, elem, 256);
return elem;
}

private static OMElement getPayload(String value) {
OMFactory factory = null;
OMNamespace ns = null;
OMElement elem = null;
OMElement childElem = null;

factory = OMAbstractFactory.getOMFactory();
ns = factory.createOMNamespace("http://echo.services.core.carbon.wso2.org", "ns1");
elem = factory.createOMElement("echoString", ns);
childElem = factory.createOMElement("in", null);
childElem.setText(value);
elem.addChild(childElem);
return elem;
}
}
package org.apache.ws.axis2;

import org.apache.ws.security.WSPasswordCallback;

import javax.security.auth.callback.Callback;
import javax.security.auth.callback.CallbackHandler;
import javax.security.auth.callback.UnsupportedCallbackException;

public class PWCBHandler implements CallbackHandler {

public void handle(Callback[] callbacks) throws UnsupportedCallbackException {
WSPasswordCallback cb = (WSPasswordCallback) callbacks[0];
if ("admin".equals(cb.getIdentifier())) {
cb.setPassword("admin");
} else {
cb.setPassword("wso2carbon");
}
}
}

Adding fine-grained authorization for proxy services in WSO2 ESB

With the latest WSO2 ESB - you can add fine-grained authorization with XACML, to proxy services - with the Entitlement mediator.

First you need to configure the WSO2 Identity Server 2.0 as the XACML engine and this explains how to do it.

WSO2 Identity Server 2.0 is a free and open source identity and entitlement management server, available to download from here...

Now, let's see how we can configure Entitlement mediator in the WSO2 ESB.

First, we are creating a proxy service going through the following wizard.

Under In Sequence- we are creating an Anonymous sequence - to include Entitlement,Header and Send mediators.

First let's add Advanced/Entitlement Mediator - to the InSequence.

Here, the Entitlement Server should be the endpoint from the Identity Server 2.0, where entitlement engine is running [https://[IDENTITY_SERVER]:[PORT]/services/].

And, the user we set there, should have login and manage configuration permissions in the Identity Server.

Now, let's add the Transform/Header mediator.

There you need to remove the 'Security' header. Click on the Namespaces link to set the wsse namespace.

Prefif : wsse
URI:http://docs.oasis-open.org/wss/2004/01/oasis-200401-wss-wssecurity-secext-1.0.xsd

Now, add a Core/Send mediator and save to return to the main flow.

Add a Core/Send mediator to the Out Sequence as an Anonymous sequence and save to return to the main flow - and complete creating the proxy service.

Now, we need to apply UsernameToken security policy to the proxy service we just created. This explains how to do it.

Here - we have a slight issue, since the security policy being applied to the binding by the policy editor - this has an issue with proxy services.

To overcome this, from the service listing, select the proxy service and then select 'Policies' - there remove the applied policies from the Binding Hierarchy and add that policy to the Service Hierarchy.

That's it - and all done - we are ready with the proxy service.

Now - we need to write a client to invoke the secured proxy service.

The following client tries to invoke the echo service deployed in ESB - through the proxy service we just created.
package org.apache.ws.axis2;

import org.apache.axiom.om.OMAbstractFactory;
import org.apache.axiom.om.OMElement;
import org.apache.axiom.om.OMFactory;
import org.apache.axiom.om.OMNamespace;
import org.apache.axiom.om.impl.builder.StAXOMBuilder;
import org.apache.axis2.Constants;
import org.apache.axis2.addressing.EndpointReference;
import org.apache.axis2.client.Options;
import org.apache.axis2.client.ServiceClient;
import org.apache.axis2.context.ConfigurationContext;
import org.apache.axis2.context.ConfigurationContextFactory;
import org.apache.neethi.Policy;
import org.apache.neethi.PolicyEngine;
import org.apache.rampart.RampartMessageData;

public class TestClient {

final static String ADDR_URL = "http://192.168.1.2:8280/services/echo";
final static String TRANS_URL = "https://192.168.1.2:8243/services/test"; 

public static void main(String[] args) throws Exception {
ServiceClient client = null;
Options options = null;
OMElement response = null;
ConfigurationContext context = null;
String trustStore = null;

// You need to import the ESBs public certificate to this key store.
trustStore = "mykeystore.jks";
// We are accessing ESB over HTTPS - so need to set trustStore parameters.
System.setProperty("javax.net.ssl.trustStore", trustStore);
// Password of mykeystore.jks
System.setProperty("javax.net.ssl.trustStorePassword", "wso2carbon");

// Create configuration context - you will have Rampart module engaged in the client.axis2.xml
context = ConfigurationContextFactory.createConfigurationContextFromFileSystem("repo","repo/conf/client.axis2.xml");

// This is the security policy of the proxy service applied UT.
StAXOMBuilder builder = new StAXOMBuilder("policy.xml");
Policy policy = PolicyEngine.getPolicy(builder.getDocumentElement());

context = ConfigurationContextFactory.createConfigurationContextFromFileSystem("repo","repo/conf/client.axis2.xml");
client = new ServiceClient(context, null);
options = new Options();
options.setAction("urn:echoString");
// This is the addressing URL pointing to the echo service deployed in ESB
options.setTo(new EndpointReference(ADDR_URL));
// To the ESB, the proxy service
options.setUserName("admin");
options.setPassword("admin");
// TRANS_URL points to proxy service
options.setProperty(Constants.Configuration.TRANSPORT_URL, TRANS_URL);
options.setProperty(RampartMessageData.KEY_RAMPART_POLICY, policy);
client.setOptions(options);
client.engageModule("addressing");
client.engageModule("rampart");
response = client.sendReceive(getPayload("Hello world"));
System.out.println(response);
}

private static OMElement getPayload(String value) {
OMFactory factory = null;
OMNamespace ns = null;
OMElement elem = null;
OMElement childElem = null;

factory = OMAbstractFactory.getOMFactory();
ns = factory.createOMNamespace("http://echo.services.core.carbon.wso2.org", "ns1");
elem = factory.createOMElement("echoString", ns);
childElem = factory.createOMElement("in", null);
childElem.setText(value);
elem.addChild(childElem);
return elem;
}
}

Identity Server 2.0 as an XACML engine

WSO2 Identity Server 2.0 is a free and open source identity and entitlement management server, available to download from here...

XACML support for fine-grained authorization comes with WSO2 Identity Server 2.0 for the first time as an experimental feature - though it includes full support for policies based on XACML 2.0.

To start with - you need to login to Identity Sever management console with an account having permissions login and manage configuration. That is, you can simply login with admin/admin.

1. Go to 'Policies' listed under 'Entitlement' menu.

2. There you can add a new policy or import external policy files to the system.

3. Once you click to add - it will simply add a template policy - where you can edit to suit your requirements - or you may add a complete new policy.

4. For the time being, I am just adding the template policy with no changes and let's see how to evaluate it - click on the 'Evaluate Entitlement Policies' link.

Here you can build your own XACML request to evaluate the policy just added.

Simply copy and paste the following on the above screen and click 'Evaluate'.
<Request xmlns="urn:oasis:names:tc:xacml:2.0:context:schema:os" xmlns:xsi="http://www.w3.org/2001/XMLSchema-instance">
<Subject>
<Attribute AttributeId="urn:oasis:names:tc:xacml:1.0:subject:subject-id"
DataType="http://www.w3.org/2001/XMLSchema#string">
<AttributeValue>admin</AttributeValue>
</Attribute>
<Attribute AttributeId="group"
DataType="http://www.w3.org/2001/XMLSchema#string">
<AttributeValue>admin</AttributeValue>
</Attribute>
</Subject>
<Resource>
<Attribute AttributeId="urn:oasis:names:tc:xacml:1.0:resource:resource-id" DataType="http://www.w3.org/2001/XMLSchema#string">
<AttributeValue>http://localhost:8280/services/echo/echoString</AttributeValue>
</Attribute>
</Resource>
<Action>
<Attribute AttributeId="urn:oasis:names:tc:xacml:1.0:action:action-id" DataType="http://www.w3.org/2001/XMLSchema#string">
<AttributeValue>read</AttributeValue>
</Attribute>
</Action>
<Environment/>
</Request>
In plain English above request says, 'admin' user who belongs to the group 'admin' - trying to access the echoString operation of http://localhost:8280/services/echo service.

Now, let's see - how our template policy evaluates the above.

Find the following section of the template policy;
<Resources>
<Resource>
<ResourceMatch MatchId="urn:oasis:names:tc:xacml:1.0:function:string-regexp-match">
<AttributeValue DataType="http://www.w3.org/2001/XMLSchema#string">http://localhost:8280/services/echo/
<ResourceAttributeDesignator
AttributeId="urn:oasis:names:tc:xacml:1.0:resource:resource-id" DataType="http://www.w3.org/2001/XMLSchema#string"/>
</ResourceMatch>
</Resource>
</Resources>
Here in this policy we use the function:string-regexp-match to validate the service name + operation name combination. You can modify it to suit your own requirement.

For example, if you want to allow users to access all the services deployed on a certain server, then simply change it to "http://localhost:8280/"

Or else, if you want user to access only a set of operations you can simply change the regex to http://localhost:8280/services/echo/(echoString|echoInt).

Now let's focus on the following code segment - it is to evaluate user name and his group
<Condition>
<Apply FunctionId="urn:oasis:names:tc:xacml:1.0:function:string-is-in">
<AttributeValue DataType="http://www.w3.org/2001/XMLSchema#string">admin</AttributeValue>
<SubjectAttributeDesignator
AttributeId="urn:oasis:names:tc:xacml:1.0:subject:subject-id"
DataType="http://www.w3.org/2001/XMLSchema#string" SubjectCategory="urn:oasis:names:tc:xacml:1.0:subject-category:access-subject"/>
</Apply>
</Condition>
<Condition>
<Apply FunctionId="urn:oasis:names:tc:xacml:1.0:function:string-is-in">
<AttributeValue DataType="http://www.w3.org/2001/XMLSchema#string">admin</AttributeValue>
<SubjectAttributeDesignator AttributeId="group" DataType="http://www.w3.org/2001/XMLSchema#string"/>
</Apply>
</Condition>
Here we validate user 'admin' or any user in the group 'admin'.

In future posts I'll further talk about how we could customize the template policy to fit into different business requirements.

Security Token Service with WSO2 Identity Server 2.0

WSO2 Identity Server 2.0 is a free and open source identity and entitlement management server, available to download from here...

This blog post explains how to access Identity Server 2.0 Security Token Service [STS] programmatically.

First you need to configure the Identity Server STS to issue security tokens.

Login as admin/admin to the management console and access 'Security Token Service'.

There you need to enter the relying parties you trust - in other words, which relying parties who will accept security tokens from the Identity Server.

You need to upload the public certificate of the trusted relying party - against it's end point.

When issuing tokens - it'll be encrypted from the public key of the trusted relying party.

So - even the client who obtains the token to send to the RP - has no visibility to the included token.


Now - let's apply security to the STS - here we provide UsernameToken based security - that means, to obtain a token from the STS, the client should have a valid user account with the Identity Server.

Click on the 'Apply Security Policy' link to configure security and go through the wizard.


That's it and that's all we need to configure Identity Server STS to issue security tokens.

Let's focus on the client code.
package org.apache.ws.axis2;

import org.apache.axiom.om.OMAbstractFactory;
import org.apache.axiom.om.OMElement;
import org.apache.axiom.om.OMFactory;
import org.apache.axiom.om.impl.builder.StAXOMBuilder;
import org.apache.axis2.context.ConfigurationContext;
import org.apache.axis2.context.ConfigurationContextFactory;
import org.apache.neethi.Policy;
import org.apache.neethi.PolicyEngine;
import org.apache.rahas.RahasConstants;
import org.apache.rahas.Token;
import org.apache.rahas.TrustUtil;
import org.apache.rahas.client.STSClient;
import org.apache.rampart.policy.model.RampartConfig;
import org.apache.ws.secpolicy.Constants;
import org.opensaml.XML;

public class IdentitySTSClient {

/**
* @param args
*/

final static String RELYING_PARTY_SERVICE_EPR = "http://192.168.1.2:8280/services/echo";
final static String STS_EPR = "https://localhost:9443/services/wso2carbon-sts";

/**
* @param args
* @throws Exception
*/
public static void main(String[] args) throws Exception {
ConfigurationContext confContext = null;
Policy stsPolicy = null;
STSClient stsClient = null;
Policy servicePolicy = null;
Token responseToken = null;
String trustStore = null;

// You need to import the Identity Server, public certificate to this key store.
trustStore = "clientkeystore.jks";
// We are accessing STS over HTTPS - so need to set trustStore parameters.
System.setProperty("javax.net.ssl.trustStore", trustStore);
System.setProperty("javax.net.ssl.trustStorePassword", "wso2carbon");

// Create configuration context - you will have Rampart module engaged in the client.axis2.xml
confContext = ConfigurationContextFactory.createConfigurationContextFromFileSystem("repo","repo/conf/client.axis2.xml");

stsClient = new STSClient(confContext);

stsClient.setRstTemplate(getRSTTemplate());
stsClient.setAction(RahasConstants.WST_NS_05_02 + RahasConstants.RST_ACTION_SCT);

// This is the security policy we applied to Identity Server STS.
// You can see it by https://[IDENTITY_SERVER]/services/wso2carbon-sts?wsdl
stsPolicy = loadPolicy("sts.policy.xml");

// This is the security of the relying party web service.
// This policy will accept a security token issued from Identity Server STS
servicePolicy = loadPolicy("service.policy.xml");

responseToken = stsClient.requestSecurityToken(servicePolicy, STS_EPR, stsPolicy, RELYING_PARTY_SERVICE_EPR);  

System.out.println(responseToken.getToken());

}

private static Policy loadPolicy(String xmlPath) throws Exception {
StAXOMBuilder builder = null;
Policy policy = null;
RampartConfig rc = null;
builder = new StAXOMBuilder(xmlPath);
policy = PolicyEngine.getPolicy(builder.getDocumentElement());
rc = new RampartConfig();
rc.setUser("admin");  
// You need to have password call-back class to provide the user password
rc.setPwCbClass(PWCBHandler.class.getName());
policy.addAssertion(rc);
return policy;
}

private static OMElement getRSTTemplate() throws Exception {
OMFactory fac = OMAbstractFactory.getOMFactory();
OMElement elem = fac.createOMElement(Constants.RST_TEMPLATE);
TrustUtil.createTokenTypeElement(RahasConstants.VERSION_05_02, elem).setText(XML.SAML_NS);
TrustUtil.createKeyTypeElement(RahasConstants.VERSION_05_02, elem,
RahasConstants.KEY_TYPE_SYMM_KEY);
TrustUtil.createKeySizeElement(RahasConstants.VERSION_05_02, elem, 256);
return elem;
}
}

Building WSO2 Identity Server 2.0 from source

Recommended maven version is 2.1.0 and set MAVEN_OPTS="-Xmx1024m -XX:MaxPermSize=128m"

Downlaod source from https://wso2.org/repos/wso2/branches/carbon-platform/2.0 and build WSS4J/Axis2/Transports/Sandesha2/Savan/Rampart/Synapse in the given order.

mvn clean install

Download source for carbon-orbit from https://wso2.org/repos/wso2/trunk/carbon-orbit;

mvn clean install

Download source for carbon-core from https://wso2.org/repos/wso2/trunk/carbon;

mvn clean install

Download source for carbon-components from https://wso2.org/repos/wso2/trunk/carbon-components;

mvn clean install -Dproduct=is

Download source for Identity Server product from https://wso2.org/repos/wso2/trunk/solutions/identity;

mvn clean install

You can find the binary distribution at [https://wso2.org/repos/wso2/trunk/solutions/identity]/modules/distribution/target