Showing posts with label STS. Show all posts

Security Token Service with WSO2 Identity Server 2.0

WSO2 Identity Server 2.0 is a free and open source identity and entitlement management server, available to download from here...

This blog post explains how to access Identity Server 2.0 Security Token Service [STS] programmatically.

First you need to configure the Identity Server STS to issue security tokens.

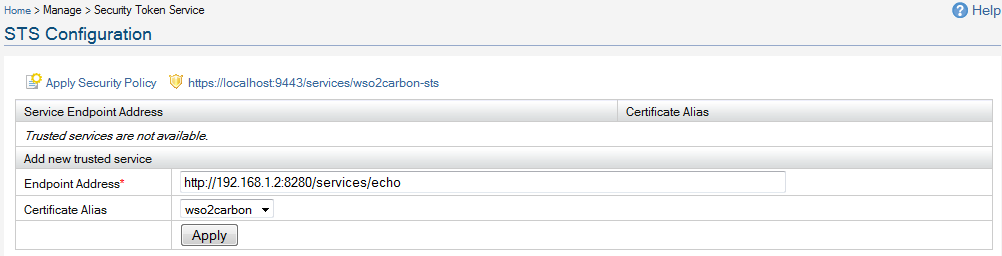
Login as admin/admin to the management console and access 'Security Token Service'.

There you need to enter the relying parties you trust - in other words, which relying parties who will accept security tokens from the Identity Server.

You need to upload the public certificate of the trusted relying party - against it's end point.

When issuing tokens - it'll be encrypted from the public key of the trusted relying party.

So - even the client who obtains the token to send to the RP - has no visibility to the included token.


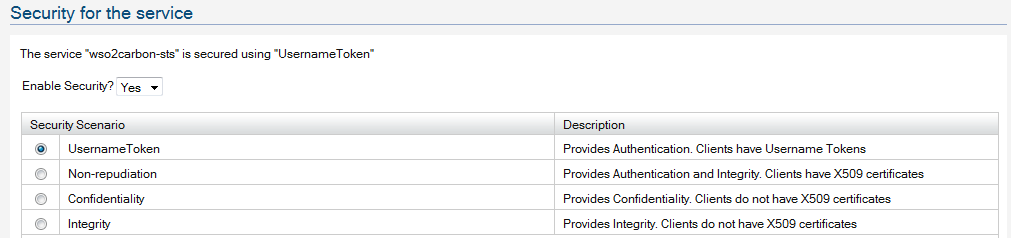
Now - let's apply security to the STS - here we provide UsernameToken based security - that means, to obtain a token from the STS, the client should have a valid user account with the Identity Server.

Click on the 'Apply Security Policy' link to configure security and go through the wizard.


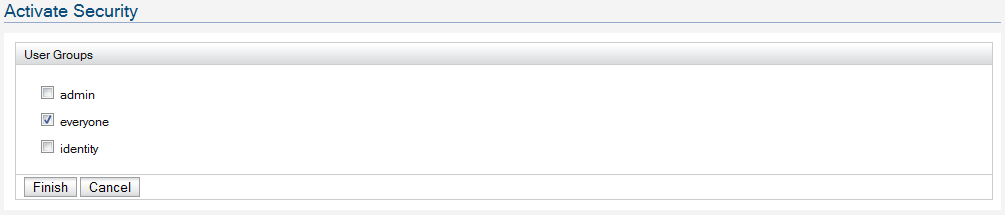
That's it and that's all we need to configure Identity Server STS to issue security tokens.

Let's focus on the client code.
package org.apache.ws.axis2;

import org.apache.axiom.om.OMAbstractFactory;
import org.apache.axiom.om.OMElement;
import org.apache.axiom.om.OMFactory;
import org.apache.axiom.om.impl.builder.StAXOMBuilder;
import org.apache.axis2.context.ConfigurationContext;
import org.apache.axis2.context.ConfigurationContextFactory;
import org.apache.neethi.Policy;
import org.apache.neethi.PolicyEngine;
import org.apache.rahas.RahasConstants;
import org.apache.rahas.Token;
import org.apache.rahas.TrustUtil;
import org.apache.rahas.client.STSClient;
import org.apache.rampart.policy.model.RampartConfig;
import org.apache.ws.secpolicy.Constants;
import org.opensaml.XML;

public class IdentitySTSClient {

/**
* @param args
*/

final static String RELYING_PARTY_SERVICE_EPR = "http://192.168.1.2:8280/services/echo";
final static String STS_EPR = "https://localhost:9443/services/wso2carbon-sts";

/**
* @param args
* @throws Exception
*/
public static void main(String[] args) throws Exception {
ConfigurationContext confContext = null;
Policy stsPolicy = null;
STSClient stsClient = null;
Policy servicePolicy = null;
Token responseToken = null;
String trustStore = null;

// You need to import the Identity Server, public certificate to this key store.
trustStore = "clientkeystore.jks";
// We are accessing STS over HTTPS - so need to set trustStore parameters.
System.setProperty("javax.net.ssl.trustStore", trustStore);
System.setProperty("javax.net.ssl.trustStorePassword", "wso2carbon");

// Create configuration context - you will have Rampart module engaged in the client.axis2.xml
confContext = ConfigurationContextFactory.createConfigurationContextFromFileSystem("repo","repo/conf/client.axis2.xml");

stsClient = new STSClient(confContext);

stsClient.setRstTemplate(getRSTTemplate());
stsClient.setAction(RahasConstants.WST_NS_05_02 + RahasConstants.RST_ACTION_SCT);

// This is the security policy we applied to Identity Server STS.
// You can see it by https://[IDENTITY_SERVER]/services/wso2carbon-sts?wsdl
stsPolicy = loadPolicy("sts.policy.xml");

// This is the security of the relying party web service.
// This policy will accept a security token issued from Identity Server STS
servicePolicy = loadPolicy("service.policy.xml");

responseToken = stsClient.requestSecurityToken(servicePolicy, STS_EPR, stsPolicy, RELYING_PARTY_SERVICE_EPR);  

System.out.println(responseToken.getToken());

}

private static Policy loadPolicy(String xmlPath) throws Exception {
StAXOMBuilder builder = null;
Policy policy = null;
RampartConfig rc = null;
builder = new StAXOMBuilder(xmlPath);
policy = PolicyEngine.getPolicy(builder.getDocumentElement());
rc = new RampartConfig();
rc.setUser("admin");  
// You need to have password call-back class to provide the user password
rc.setPwCbClass(PWCBHandler.class.getName());
policy.addAssertion(rc);
return policy;
}

private static OMElement getRSTTemplate() throws Exception {
OMFactory fac = OMAbstractFactory.getOMFactory();
OMElement elem = fac.createOMElement(Constants.RST_TEMPLATE);
TrustUtil.createTokenTypeElement(RahasConstants.VERSION_05_02, elem).setText(XML.SAML_NS);
TrustUtil.createKeyTypeElement(RahasConstants.VERSION_05_02, elem,
RahasConstants.KEY_TYPE_SYMM_KEY);
TrustUtil.createKeySizeElement(RahasConstants.VERSION_05_02, elem, 256);
return elem;
}
}

Secure Token Service with WSO2 WSAS 3.0

WSO2 WSAS is an enterprise ready Web services engine powered by Apache Axis2. It is a lightweight, high performing platform for Service Oriented Architectures, enabling business logic and applications. Bringing together a number of Apache Web services projects, WSO2 WSAS provides a secure, transactional and reliable runtime for deploying and managing Web services.

From version 3.0 onwards, WSO2 WSAS is powered by Carbon.

This post takes you through all the steps required in setting up the STS ships with WSAS to secure a given service.

First you need to download WSAS 3.0 from here.

WSAS distribution comes with an STS sample - and let's see how to set it up.

Go to [WSAS_HOME]/samples/sts-sample and type ant

Start WSO2 WSAS (If you haven't already started it)

Log into WSO2 WSAS administration console with admin/admin

Go to Service --> List --> Select "wso2carbon-sts" service --> Security --> setup security scenario "Sign and encrypt - X509 Authentication" on it.

Make sure wso2carbon.jks keystore (WSO2WSAS keystore) is used.

Go to Service --> List --> Select "HelloService" service and copy the http service address.

Once again select "wso2carbon-sts" service and navigate to "Configure STS". Paste/type the http endpoint address of "HelloService" service in "Add new trusted service"->"Endpoint Address". Select the WSO2WSAS private key's certificate alias (wso2carbon)

Go back to "HelloService" service and setup security scenario "SecureConversation - Sign and Encrypt - Service as STS - Bootstrap policy - Sign and Encrypt , X509 Authentication" on it.Makesure wso2carbon.jks keystore (WSO2WSAS keystore) is used.

Go to Key Stores --> Import Cert -- > Import [WSAS_HOME]/samples/sts-sample/conf/client.cert into the wso2carbon keystore.

Go to [WSAS_HOME]/samples/sts-sample and run the client.

run-client.bat <wso2carbon-sts-http-address> <hello-service-http-address>

Example :

run-client.bat http://10.100.1.97:9763/services/wso2carbon-sts http://10.100.1.97:9763/services/HelloService

Notes:

1. You need to download Java Cryptography Extension (JCE) Unlimited Strength Jurisdiction Policy Files 5.0 from here and copy the two jar files from the extracted jce directory (local_policy.jar and US_export_policy.jar)to $JAVA_HOME/jre/lib/security.

2. Make sure is exactly the same as the url you added as a trusted service to the STS

Secure Conversation with STS

This post explains steps required in setting up a Secure Conversation between a client and a service with the aid of an STS[Secure Token Service].

Lets start with setting up the STS and configuring its security policy.

First, download WSAS from here.

WSO2 WSAS is an enterprise ready Web services engine powered by Apache Axis2 and it comes with a built in STS and a set of sample services[e.g. echo service] which we can use during this demonstration.

Download wso2wsas.jks from here and copy it to [WSAS_HOME]\conf - or basically replace the existing one. This is a work-around for this issue.

Start WSAS and login with admin/admin.

Select 'Services' and then 'wso2wsas-sts'[under 'Services' column].

Click on 'Manage Security Configuration' and select 'option - 3', that is 'Sign and encrypt - X509 Authentication'.

Keep 'wso2wsas.jks' as the private keystore.

Go back to Services\wso2wsas-sts and click on 'STS Configuration'.

Set,

Endpoint Address = http://localhost:9762/services/echo
Certificate Alias = wso2wsas


And apply.

Lets configure security policy for the echo service.

Select 'Services' and then 'echo'[under 'Services' column].

Click on 'Manage Security Configuration' and select 'option - 11', that is 'SecureConversation - Sign and Encrypt - Service as STS - Bootstrap policy - Sign and Encrypt , X509 Authentication'.

Keep 'wso2wsas.jks' as the private keystore.

All set, lets start with the client.

You can download the Eclipse project for the client from here and import it to a new Eclipse workspace.

Share the folder [CLIENT]\lib and map it to the network drive "W".

Refresh your workspace and it should build with no compile errors.

Build and run the client, you should see the out put on the console.

Lets get in to more details.

First, client will request a Security Context Token [SCT] from the STS.

Following code does it for you.
final static String STS_EPR = "http://localhost:9762/services/wso2wsas-sts";
final static String SERVICE_EPR = "http://localhost:9762/services/echo";

ServiceClient client = null;
ConfigurationContext ctx = null;
Policy stsPolicy = null;
STSClient stsClient = null;
Policy servicePolicy = null;
Token responseToken = null;
TokenStorage store = null;

ctx = ConfigurationContextFactory.createConfigurationContextFromFileSystem("repo","repo/conf/client.axis2.xml");

stsClient = new STSClient(ctx);
stsClient.setRstTemplate(getRSTTemplate());
stsClient.setAction(RahasConstants.WST_NS_05_02 + RahasConstants.RST_ACTION_SCT);

stsPolicy = loadPolicy("sts.policy.xml");
servicePolicy = loadPolicy("service.policy.xml"); 

responseToken = stsClient.requestSecurityToken(ervicePolicy,STS_EPR,stsPolicy,SERVICE_EPR);

// Store token
store = TrustUtil.getTokenStore(ctx);
store.add(responseToken);
You'll notice the following in the out-going SOAP request.
<wsa:To>http://localhost:9762/services/wso2wsas-sts
<wsa:ReplyTo>
<wsa:Address>
http://schemas.xmlsoap.org/ws/2004/08/addressing/role/anonymous
</wsa:Address>
</wsa:ReplyTo>
<wsa:MessageID>urn:uuid:E463557299CDEAE3B71225299469127</wsa:MessageID>
<wsa:Action>http://schemas.xmlsoap.org/ws/2005/02/trust/RST/SCT</wsa:Action>
And following is a part of the SOAP message reponse from the STS.
<wsa:To>http://schemas.xmlsoap.org/ws/2004/08/addressing/role/anonymous</wsa:To>
<wsa:MessageID>urn:uuid:292D5247502C9F172F1225299475624</wsa:MessageID>
<wsa:Action>http://schemas.xmlsoap.org/ws/2005/02/trust/RSTR/Issue</wsa:Action>
<wsa:RelatesTo>urn:uuid:E463557299CDEAE3B71225299469127</wsa:RelatesTo>
Basically, SCT binding of WS-Trust defines how to use WS-Trust to request and return SCTs.

As you already noticed in the above two extracts when requesting and issuing security context tokens, following Action URIs are used.
<wsa:Action>http://schemas.xmlsoap.org/ws/2005/02/trust/RST/SCT</wsa:Action>

<wsa:Action>http://schemas.xmlsoap.org/ws/2005/02/trust/RSTR/Issue</wsa:Action>
Once received the SCT from STS, client is ready to talk to the service.
ServiceClient client = null;
Options options = null;

client = new ServiceClient(ctx, null);
client.engageModule("rampart");
client.engageModule("addressing");

options = new Options();
options.setAction("urn:echoOMElement");
options.setSoapVersionURI(SOAP12Constants.SOAP_ENVELOPE_NAMESPACE_URI);
options.setProperty(RampartMessageData.KEY_RAMPART_POLICY, servicePolicy);
options.setProperty(RampartMessageData.SCT_ID, responseToken.getId());
options.setTo(new EndpointReference(SERVICE_EPR));

client.setOptions(options);
client.sendReceive(getPayload("Hello"));
The above code will generate two SOAP request/reponse message pairs in between client and the service.

Lets look at a part of the first SOAP request from the client to the service.
<wsa:To>http://localhost:9762/services/echo</wsa:To>
<wsa:ReplyTo>
<wsa:Address>
http://schemas.xmlsoap.org/ws/2004/08/addressing/role/anonymous
</wsa:Address>
</wsa:ReplyTo>
<wsa:MessageID>urn:uuid:E463557299CDEAE3B71225299475512</wsa:MessageID>
<wsa:Action>http://schemas.xmlsoap.org/ws/2005/02/trust/RST/SCT</wsa:Action>
And following is an extract from the first response from the service.
<wsa:To>http://schemas.xmlsoap.org/ws/2004/08/addressing/role/anonymous</wsa:To>
<wsa:MessageID>urn:uuid:292D5247502C9F172F1225299476906</wsa:MessageID>
<wsa:Action>http://schemas.xmlsoap.org/ws/2005/02/trust/RSTR/SCT</wsa:Action>
<wsa:RelatesTo>urn:uuid:E463557299CDEAE3B71225299475512</wsa:RelatesTo>
Once done with this initial step, client will invoke the services's business logic.
<wsa:To>http://localhost:9762/services/echo</wsa:To>
<wsa:MessageID>urn:uuid:E463557299CDEAE3B71225299475492</wsa:MessageID>
<wsa:Action>urn:echoOMElement</wsa:Action>