ERROR - ProxyService Error reading from wsdl URI

$subject could be a common error for many new ESB users - so, thought of keeping a note here.

This could easily happen if you create a proxy service against the sample echo service which ships with WSO2 ESB - and WSDL was pointed with an URI - and the corresponding WSDL is unavailable at the time proxy service been deployed [i.e. When the ESB is restarted]

<publishWSDL uri="http://localhost:8280/services/echo?wsdl"/>

To recover from this error - you need to edit the file [ESB_HOME]/repository/conf/synapse-config/proxy-services/your_service_name.xml and add the following parameter..
<proxy name="test" transports="https http" startOnLoad="true" trace="disable">
         ..............
         ..................
        <parameter name="enablePublishWSDLSafeMode">true</parameter>
    </proxy>

Now restart the ESB and you will notice that this particular proxy service is not loaded - but the ESB starts fine.

To handle this issue in a more generic way - a fail-safe mode to be introduced in to the upcoming release of WSO2 ESB - further details here...

Enforcing JDBC clients to use SSL with MySQL Server

1. First you need to enable SSL at both the server and the client as per my previous blog post.

2. There you would have noticed that - even though we enabled SSL at the server end - still the JDBC clients can connect with out using SSL.

3. To enforce SSL for the JDBC connection from the client end - we need to have REQUIRE SSL - in the GRANT statement for the MySQL user associated with the JDBC client.

e.g :

GRANT ALL ON regdb.* TO regadmin@localhost IDENTIFIED BY "regadmin" REQUIRE SSL;

4. Now regadmin user won't be able to connect to the regdb database without a JDBC connection over SSL.

Deploying WSO2 Carbon Server over Novell eDirectory

Recently we did the $subject in a production deployment and thought of keeping a small note here.

I blogged about the $subject sometime back here - but that is no more applicable to Carbon 3.0.x products.

To deploy WSO2 Carbon Server over Novell eDirectory - you can follow the exact guidelines provided in this blog post - following is the only exception.

Instead of setting objectClass=person under UserNameListFilter property - set, objectClass=Person

Note : 'P' is in upper-case there.

Connecting WSO2 Carbon Server to a MySQL DB over a Secured Channel

In my previous blog post I explain how to connect WSO2 Carbon Server to a MySQL database. Please make sure it works fine before going through this.

In this blog post I will only explain changes required to enable SSL.

SSL in MySQL Connector/J encrypts all data (other than the initial handshake) between the JDBC driver and the server. The performance penalty for enabling SSL is an increase in query processing time between 35% and 50%, depending on the size of the query, and the amount of data it returns.

1. Verify whether your MySQL distribution supports SSL. Use following command and make sure it doesn't result with an Error.
$ cd /usr/local/mysql

$ sudo ./bin/mysqld_safe --ssl
101226 13:50:26 mysqld_safe Logging to '/usr/local/mysql-5.1.51-osx10.6-x86_64/data/prabath-siriwardenas-MacBook-Pro.local.err'.
101226 13:50:26 mysqld_safe Starting mysqld daemon with databases from /usr/local/mysql-5.1.51-osx10.6-x86_64/data
2. Then login to the mysql and run the following query.
mysql> SHOW VARIABLES LIKE 'have_ssl';
+---------------+-------+
| Variable_name | Value |
+---------------+-------+
| have_ssl      | YES   |
+---------------+-------+
1 row in set (0.00 sec)
3. If all works fine - then your MySQL distribution is enabled for SSL.

4. Now we need to set certificate to the MySQL Server. Here I am generating certificates with OpenSSL and copy them to /usr/local/mysql/ssl [If you don't see a directory 'ssl' - just create one there.]
$ pwd
/usr/local/mysql/ssl

$ openssl  req -x509 -newkey rsa:1024 -keyout server-key.key -out server-cert.pem

$ cp server-cert.pem ca-cert.pem

$ openssl rsa -in server-key.key -out server-key.pem

5. Stop the running mysql server and start it as below.
$ cd /usr/local/mysql

$ sudo  ./bin/mysqld_safe  --ssl-ca=/usr/local/mysql/ssl/ca-cert.pem  --ssl-cert=/usr/local/mysql/ssl/server-cert.pem  --ssl-key=/usr/local/mysql/ssl/server-key.pem
 
101226 18:16:42 mysqld_safe Logging to '/usr/local/mysql-5.1.51-osx10.6-x86_64/data/prabath-siriwardenas-MacBook-Pro.local.err'.
101226 18:16:42 mysqld_safe Starting mysqld daemon with databases from /usr/local/mysql-5.1.51-osx10.6-x86_64/data
6. Once again login to the mysql and run the following query.
mysql> SHOW VARIABLES LIKE '%ssl%';
+---------------+--------------------------------------+
| Variable_name | Value                                |
+---------------+--------------------------------------+
| have_openssl  | YES                                  |
| have_ssl      | YES                                  |
| ssl_ca        | /usr/local/mysql/ssl/ca-cert.pem     |
| ssl_capath    |                                      |
| ssl_cert      | /usr/local/mysql/ssl/server-cert.pem |
| ssl_cipher    |                                      |
| ssl_key       | /usr/local/mysql/ssl/server-key.pem  |
+---------------+--------------------------------------+
7 rows in set (0.01 sec)
7. That's it we all need from the MySQL Server end.

8. Now you need to import the public certificate and the CA certificate of MySQL server to [CARBON_HOME]\resources\security\client-truststore.jks. But in this case since we use verifyServerCertificate=false in the JDBC connection url of the WSO2 Carbon Server - we can skip this step.

9. Now in both the user-mgt.xml and registry.xml we need to edit the ConnectionUrl and add useSSL=true, verifyServerCertificate=false and requireSSL=true.

jdbc:mysql://localhost:3306/regdb?verifyServerCertificate=false&useSSL=true&requireSSL=true

Deploying WSO2 Carbon Server over a secured LDAP [s] connection

Please refer my previous blog post to see how to deploy WSO2 Carbon Server over a LDAP User Store.

I will highlight only the changes from there - when it comes to a secured LDAP connection.

1. Change the ConnectionURL and set ldaps instead of ldap and set the port correctly.

2. Import the LDAP server's SSL certificate in DER format to [CARBON_HOME]\resources\security\client-truststore.jks. If the certificate is not in DER format you can use OpenSSL to convert it to DER.

3. When starting the Carbon Server - start as following.

$ sh wso2server.sh -Djavax.net.ssl.trustStore=/[CARBON_HOME]/resources/security/client-truststore.jks -Djavax.net.ssl.trustStorePassword=wso2carbon

There replace [CARBON_HOME] with your absolute path to CARBON_HOME.

That's it.

Deploying WSO2 Carbon over an LDAP User Store

Open up the [CARBON_HOME]\repository\conf\user-mgt.xml and replace it's content with the following.

ConnectionURL : Connection URL to the LDAP server
ConnectionName : Full qualified name of a user to access the LDAP server.
ConnectionPassword: Password of the ConnectionName. If you allow anonymous access keep this blank.
UserSearchBase : Where the system should find the users - ConnectionName should be within the UserSearchBase
UserNameListFilter: This is to narrow down the search. Set the objectClass properly.
UserNameAttribute : This should be attribute where the system will take as the user name for login.
ReadLDAPGroups : If true will read groups from the LDAP server.
GroupSearchBase : Where the system should find the groups.
GroupSearchFilter : This is to narrow down the search. Set the objectClass properly.
GroupNameAttribute: This should be attribute where the system will take as the group name.
AdminUser/UserName: This user will be treated as the initial admin of the system. Should be belonging to the UserSearchBase in LDAP. Keep the password of this user blank.
<UserManager>
    <Realm>
        <Configuration>
                <AdminRole>admin</AdminRole>
                <AdminUser>
                     <UserName>prabath</UserName>
                     <Password>XXXXXX</Password>
                </AdminUser>
            <EveryOneRoleName>everyone</EveryOneRoleName> <!-- By default users in thsi role sees the registry root -->
            <ReadOnly>true</ReadOnly>
            <MaxUserNameListLength>500</MaxUserNameListLength>
            <Property name="url">jdbc:h2:repository/database/WSO2CARBON_DB</Property>
            <Property name="userName">wso2carbon</Property>
            <Property name="password">wso2carbon</Property>
            <Property name="driverName">org.h2.Driver</Property>
            <Property name="maxActive">50</Property>
            <Property name="maxWait">60000</Property>
            <Property name="minIdle">5</Property>
        </Configuration>
        <UserStoreManager
            class="org.wso2.carbon.user.core.ldap.LDAPUserStoreManager">
            <Property name="ConnectionURL">ldap://localhost:10389</Property>
            <Property name="ConnectionName">uid=admin,ou=system</Property>
            <Property name="ConnectionPassword">secret</Property>
            <Property name="UserSearchBase">ou=system</Property>
            <Property name="UserNameListFilter">(objectClass=person)</Property>
            <Property name="UserNameAttribute">uid</Property>
            <Property name="ReadLDAPGroups">false</Property>
            <Property name="GroupSearchBase">ou=system</Property>
            <Property name="GroupSearchFilter">(objectClass=groupOfNames)</Property>
            <Property name="GroupNameAttribute">cn</Property>
            <Property name="MembershipAttribute">member</Property>
        </UserStoreManager>
        <AuthorizationManager
            class="org.wso2.carbon.user.core.authorization.JDBCAuthorizationManager">
        </AuthorizationManager> 
    </Realm>
</UserManager>

Deploying WSO2 Identity Server over MySQL

My previous blog post explains setting up MySQL Server and related tools under Mac OS X.

Once you are done with setting up MySQL - login as a root and execute the following SQL. You can use MySQL Workbench for this.
create database regdb;

use regdb;

GRANT ALL ON regdb.* TO regadmin@localhost IDENTIFIED BY "regadmin"
Once that is done. Open up the [IDENTITY_SERVER_HOME]\repository\conf\registry.xml and add the following section under <wso2registry>.
<dbConfig name="mysql-db">
        <url>jdbc:mysql://localhost:3306/regdb</url>
        <userName>regadmin</userName>
        <password>regadmin</password>
        <driverName>com.mysql.jdbc.Driver</driverName>
        <maxActive>80</maxActive>
        <maxWait>60000</maxWait>
        <minIdle>5</minIdle>
</dbConfig>
Now, find <currentDBConfig> in registry.xml and set it to mysql-db.

That's it for the registry.

Now, we need to set User Manager database pointing to the MySQl DB.

Open up the [IDENTITY_SERVER_HOME]\repository\conf\user-mgt.xml and edit following settings.
  <Configuration>
        ...
        <Property name="url">jdbc:mysql://localhost:3306/regdb</Property>
        <Property name="userName">regadmin</Property>
        <Property name="password">regadmin</Property>
        <Property name="driverName">com.mysql.jdbc.Driver</Property>
        <Property name="maxActive">50</Property>
        <Property name="maxWait">60000</Property>
        <Property name="minIdle">5</Property>
    </Configuration
Then you need to copy the MySQL DBC driver from http://dev.mysql.com/downloads/connector/j/5.1.html and Place it in the $IDENTITY_SERVER_HOME/repository/components/lib directory.

That's it - and start the identity server as sh bin/wso2server.sh -Dsetup

Installing MySQL Community Server and related tools in Apple Mac OS X

1. Download MySQL for MAC OS X from here and install it.

2. To start the MySQL server
$ cd /usr/local/mysql

$ sudo ./bin/mysqld_safe
101226 13:50:26 mysqld_safe Logging to '/usr/local/mysql-5.1.51-osx10.6-x86_64/data/prabath-siriwardenas-MacBook-Pro.local.err'.
101226 13:50:26 mysqld_safe Starting mysqld daemon with databases from /usr/local/mysql-5.1.51-osx10.6-x86_64/data
mysqld_safe is the recommended way to start a mysqld server on Unix and NetWare. mysqld_safe adds some safety features such as restarting the server when an error occurs and logging runtime information to an error log file.

3.Now you can download MySQL GUI tools for Mac OS X from here.

4. Once MySQL GUI tools installed - you can click on MySQL Administrator and login as root with blank password - then go to Accounts and change the root password.

5. You can download MySQL Workbench for Mac OS X from here.

Reverting selected adds in SVN

I've been used to the TortoiseSVN client for years now and it gave me everything I needed in a nice UI. Recently I moved to Mac OS X and now getting used to the SVN command line client.

I by mistake today did an svn add from the root folder - which added all .java as well as .class files.

I could do an svn revert easily, but that will revert the changes I did for existing files as well - which I do not want to happen.

So - following is the one I came up with and works really handy - and thought of sharing.

From the root folder...
$ find . -name '*.class' | xargs svn revert

Shell script for bulk signing

We at WSO2 most of the time release many products at once. With the binary distribution + source distribution + docs - amounts to a large number distributions.

And signing and generating MD5 and SHA1 for all those is a painful task.

Following script makes it easy - copy all the distributions to a single directory and copy the following script to the same directory as sign.sh and execute it as,

$ sh sign.sh prabath

Here, prabath is the alias of the GPG public key.

The following script will generate ASC,MD5 and SHA1 of all the distributions and will also dump the public key to KEYS file.

You should have installed GPG and configured it before running the script.
#!/bin/sh
rm *.asc
rm *.md5
rm *.sha1
rm KEYS
for f0 in  *.zip
 do
  echo $f0
  asc=".asc"
  md5=".md5"
  sha1=".sha1"
  f1=$f0$asc
  gpg --armor --output $f1 --detach-sig $f0
  f2=$f0$md5
  gpg --print-md MD5 $f0  > $f2
  f3=$f0$sha1
  gpg --print-md SHA1 $f0  > $f3
 done
gpg --armor --export $1 > KEYS

How to debug a shell script ?

Simple but very useful..

$ bash -xv wso2server.sh

Invoking a WCF service secured with Kerberos via WSO2 ESB

1. Set up WCF service secured with Kerberos - explained in this blog post.

2. Set up the WSO2 ESB to work with Kerberos - explained in this blog post - follow the steps 0,1,2,3 and 4.

3. Create a resource in the WSO2 ESB - embedded registry with the following content - this is the security policy we will be applying to the out going messages from the ESB to the WCF service.

In this example, I created a Resource Collection called 'policies' under /_system/governance and created a Resource called krbpolicy with the following content under /_system/governance/policies.

So, my security policy from the registry is /_system/governance/policies/krbpolicy
<?xml version="1.0" encoding="UTF-8"?>
<wsp:Policy wsu:Id="kerberossignandencrypt"
 xmlns:wsp="http://schemas.xmlsoap.org/ws/2004/09/policy"
 xmlns:wsu="http://docs.oasis-open.org/wss/2004/01/oasis-200401-wss-wssecurity-utility-1.0.xsd">
 <wsp:ExactlyOne>
  <wsp:All>
   <sp:SymmetricBinding
    xmlns:sp="http://schemas.xmlsoap.org/ws/2005/07/securitypolicy">
    <wsp:Policy>
     <sp:ProtectionToken>
      <wsp:Policy>
       <sp:KerberosToken
        sp:IncludeToken="http://schemas.xmlsoap.org/ws/2005/07/securitypolicy/IncludeToken/AlwaysToRecipient">
        <wsp:Policy>
         <sp:WssKerberosV5ApReqToken11 />
        </wsp:Policy>
       </sp:KerberosToken>
      </wsp:Policy>
     </sp:ProtectionToken>
     <sp:AlgorithmSuite>
      <wsp:Policy>
       <sp:Basic256 />
      </wsp:Policy>
     </sp:AlgorithmSuite>
     <sp:Layout>
      <wsp:Policy>
       <sp:Lax />
      </wsp:Policy>
     </sp:Layout>
     <sp:IncludeTimestamp />
     <sp:OnlySignEntireHeadersAndBody />
    </wsp:Policy>
   </sp:SymmetricBinding>
   <sp:SignedParts
    xmlns:sp="http://schemas.xmlsoap.org/ws/2005/07/securitypolicy">
    <sp:Body />
   </sp:SignedParts>
   <sp:Wss11 xmlns:sp="http://schemas.xmlsoap.org/ws/2005/07/securitypolicy">
    <sp:Policy>
     <sp:MustSupportRefKeyIdentifier />
     <sp:MustSupportRefIssuerSerial />
     <sp:MustSupportRefThumbprint />
     <sp:RequireSignatureConfirmation />
    </sp:Policy>
   </sp:Wss11>
   <sp:Trust10 xmlns:sp="http://schemas.xmlsoap.org/ws/2005/07/securitypolicy">
    <wsp:Policy>
     <sp:RequireClientEntropy />
     <sp:RequireServerEntropy />
     <sp:MustSupportIssuedTokens />
    </wsp:Policy>
   </sp:Trust10>
   <rampart:RampartConfig xmlns:rampart="http://ws.apache.org/rampart/policy">
    <rampart:timestampPrecisionInMilliseconds>true
    </rampart:timestampPrecisionInMilliseconds>
    <rampart:timestampTTL>300</rampart:timestampTTL>
    <rampart:timestampMaxSkew>300</rampart:timestampMaxSkew>
    <rampart:kerberosConfig>
     <rampart:property name="client.principal.name">client</rampart:property>
     <rampart:property name="client.principal.password">1qaz2wsx$
     </rampart:property>
     <rampart:property name="service.principal.name">service/myserver@WSO2.COM
     </rampart:property>
     <rampart:property name="java.security.auth.login.config">jaas.conf
     </rampart:property>
     <rampart:property name="javax.security.auth.useSubjectCredsOnly">true</rampart:property>
     <rampart:property name="kdc.des.aes.factor">4</rampart:property>
     <rampart:property name="java.security.krb5.conf">/Users/prabath/clients/wso2esb-3.0.1/repository/conf/krb.conf
     </rampart:property>
    </rampart:kerberosConfig>
   </rampart:RampartConfig>
  </wsp:All>
 </wsp:ExactlyOne>
</wsp:Policy>
In the policy we have to set the absolute path to the krb.conf - at the same time we need to set the username and password of the client who invokes the WCF service appropriately - and this account should be in the Active Directory.

4. Now create a proxy service - and in the InSequence - in the Endpoint pointing to the WCF service, enable security and pick the security policy we set before, from the registry.

The endpoint configuration in the synapse config will look like,
<endpoint name="endpoint_urn_uuid_81768417D4430798591291451112900558002-585115135">
                <address uri="http://192.168.2.13/EchoServices/EchoService.svc">
                    <enableSec policy="gov:/policies/krbpolicy"/>
                </address>
</endpoint>
5. Also in the InSequence we need to add a Property mediator and set the following.
<property name="PRESERVE_WS_ADDRESSING" value="true"/>
6. Now in the OutSequence - we need to remove the Security Header coming from the WCF service before the Send mediator in the OutSequence - you can do it with a Header mediator.
<header xmlns:wsse="http://docs.oasis-open.org/wss/2004/01/oasis-200401-wss-wssecurity-secext-1.0.xsd" name="wsse:Security" action="remove"/>
7. Also in the OutSequence we need to add a Property mediator and set the following.
<property name="disableAddressingForOutMessages" value="true" scope="axis2"/>
These two properties [5 & 7] are needed if the back end service is WCF and it is secured using WS-Security and ESB is acting as a passthrough. When communicating with WCF, wsa:to should point to WCF service endpoint (In axis2, it can can point to some other place, still axis2 will dispatch correctly using URL). For the pass through with security case, client should sign wsa:headers (WS-Security requirement) and hence wsa:to cannot be changed by ESB (violation of signature); Hence, the requirement for "preserve addressing". When the response comes from WCF->ESB, ESB adds addressing header regardless of whether the original message (from WCF) has addressing or not. In above case, since wsa:headers of request is signed by client, response from WCF will contain a signed wsa headers. If ESB adds one more set of addressing headers, then it will be violating protocol. Hence the requirement for "disable addressing for out messages"

8. Now your InSquence will like,
<inSequence>
                <property name="PRESERVE_WS_ADDRESSING" value="true" scope="default" type="STRING"/>
            </inSequence>
9. OutSequence will look like,
<outSequence>
                <property name="disableAddressingForOutMessages" value="true" scope="axis2"/>
                <header xmlns:wsse="http://docs.oasis-open.org/wss/2004/01/oasis-200401-wss-wssecurity-secext-1.0.xsd" name="wsse:Security" action="remove"/>
                <send/>
            </outSequence>
10. That's it :)

Kerberos authentication with WSO2 ESB

0. Set up the Active Directory as the KDC as in my previous blog post.

1. Download WSO2 ESB 3.0.1 from here unzip and apply the patches patch0003 and patch0023.These patches are not publicly available - but will be added in to the future releases. If you interested, please contact us on bizdev@wso2.com.

2. Create a file called krb.conf inside [ESB_HOME]\repository\conf and copy the following content to it.
[libdefaults] 
        default_realm = WSO2.COM 
        default_tkt_enctypes = rc4-hmac 
        default_tgs_enctypes = rc4-hmac 
        dns_lookup_kdc = true 
        dns_lookup_realm = false 

[realms] 
        WSO2.COM = { 
            kdc = 192.168.2.10
   } 
Here, WSO2.COM is my root domain name of my Active Directory, which is acting as the KDC and 192.168.2.1 is it's IP address - so you need to change them as per your setup. Make sure that you have default_realm all caps.

3. Create a file called jaas.conf inside [ESB_HOME]\repository\conf and copy the following content to it.
Server {
com.sun.security.auth.module.Krb5LoginModule required
useKeyTab=tfalse
storeKey=true
useTicketCache=false
isInitiator=false;
};
Client {
com.sun.security.auth.module.Krb5LoginModule required
useTicketCache=false;
};
4. Start the WSO2 ESB

5. Apply security to the given proxy service [during this sample we select echo sample service which is already there by default]

6. Select 'Sign & Encrypt with Anonymous' from the Security Policy wizard.

7. After applying, edit the policy and replace both bindings with the content below.
<?xml version="1.0" encoding="UTF-8"?>
<wsp:Policy wsu:Id="kerberossignandencrypt"
  xmlns:wsp="http://schemas.xmlsoap.org/ws/2004/09/policy" xmlns:wsu="http://docs.oasis-open.org/wss/2004/01/oasis-200401-wss-wssecurity-utility-1.0.xsd">
  <wsp:ExactlyOne>
    <wsp:All>
      <sp:SymmetricBinding xmlns:sp="http://schemas.xmlsoap.org/ws/2005/07/securitypolicy">
        <wsp:Policy>
          <sp:ProtectionToken>
            <wsp:Policy>
              <sp:KerberosToken sp:IncludeToken="http://schemas.xmlsoap.org/ws/2005/07/securitypolicy/IncludeToken/AlwaysToRecipient">
                <wsp:Policy>
                  <sp:WssKerberosV5ApReqToken11/>
                </wsp:Policy>
              </sp:KerberosToken>
            </wsp:Policy>
          </sp:ProtectionToken>
          <sp:AlgorithmSuite>
            <wsp:Policy>
              <sp:Basic256/>
            </wsp:Policy>
          </sp:AlgorithmSuite>
          <sp:Layout>
            <wsp:Policy>
              <sp:Lax/>
            </wsp:Policy>
          </sp:Layout>
          <sp:IncludeTimestamp/>
          <sp:OnlySignEntireHeadersAndBody/>
        </wsp:Policy>
      </sp:SymmetricBinding>
      <sp:SignedParts xmlns:sp="http://schemas.xmlsoap.org/ws/2005/07/securitypolicy">
        <sp:Body/>
      </sp:SignedParts>
      <sp:Wss11 xmlns:sp="http://schemas.xmlsoap.org/ws/2005/07/securitypolicy">
        <sp:Policy>
          <sp:MustSupportRefKeyIdentifier/>
          <sp:MustSupportRefIssuerSerial/>
          <sp:MustSupportRefThumbprint/>
          <sp:RequireSignatureConfirmation/>
        </sp:Policy>
      </sp:Wss11>
      <sp:Trust10 xmlns:sp="http://schemas.xmlsoap.org/ws/2005/07/securitypolicy">
        <wsp:Policy>
          <sp:RequireClientEntropy/>
          <sp:RequireServerEntropy/>
          <sp:MustSupportIssuedTokens/>
        </wsp:Policy>
      </sp:Trust10>
      <rampart:RampartConfig xmlns:rampart="http://ws.apache.org/rampart/policy">
        <rampart:timestampPrecisionInMilliseconds>true</rampart:timestampPrecisionInMilliseconds>
        <rampart:timestampTTL>300</rampart:timestampTTL>
        <rampart:timestampMaxSkew>300</rampart:timestampMaxSkew>
        <rampart:kerberosConfig>
          <rampart:property name="service.principal.password">1qaz2wsx$</rampart:property>
          <rampart:property name="javax.security.auth.useSubjectCredsOnly">true</rampart:property>
          <rampart:property name="java.security.krb5.conf">/Users/prabath/clients/wso2esb-3.0.1/repository/conf/krb.conf</rampart:property> 
       </rampart:kerberosConfig>
      </rampart:RampartConfig>
    </wsp:All>
  </wsp:ExactlyOne>
</wsp:Policy>
You need to set your SPN password under service.principal.password and also the absolute path to krb.conf under java.security.krb5.conf.

8. You can write the Java client to this service as explained in my previous blog post.

Kerberos authentication with WCF Service and Java Client

1. Go through this previous post and get the WCF Service running properly with the Kerberos authentication.

2. Download the Kerberos java client Eclipse project from here - import it in to an Eclipse workspace and fix the missing references - all the jars available inside [WSO2_ESB_HOME]\repository\components\plugin. You can download WSO2 ESB 3.0.1 from here.

3. rampart-core, rampart-policy and wss4j should be picked from patch0003 and patch0023. These patches are not publicly available - but will be added in to the future releases. If you interested, please contact us on bizdev@wso2.com.

4.Make sure the Eclipse project compiles.

5. Configuration files

5.1. krb.conf
[libdefaults] 
        default_realm = WSO2.COM 
        default_tkt_enctypes = rc4-hmac 
        default_tgs_enctypes = rc4-hmac 
        dns_lookup_kdc = true 
        dns_lookup_realm = false 

[realms] 
        WSO2.COM = { 
            kdc = 192.168.2.10
   } 
Here, WSO2.COM is my root domain name of my Active Directory, which is acting as the KDC and 192.168.2.1 is it's IP address - so you need to change them as per your setup. Make sure that you have default_realm all caps.

5.2 jaas.conf
Client {
com.sun.security.auth.module.Krb5LoginModule required
useTicketCache=false;
};
You must have this Client section. Here we set useTicketCache=false; so our java client need not to be running from the same Windows domain as the KDC. If you set to true, you need to be in the same Windows domain as the KDC and also edit the Windows registry at the client end - my previous blog post explains how to do that - see #6.

5.3 policy-1.xml
<rampart:kerberosConfig>
     <rampart:property name="client.principal.name">client</rampart:property>
     <rampart:property name="client.principal.password">1qaz2wsx$
     </rampart:property>
     <rampart:property name="service.principal.name">service/myserver@WSO2.COM
     </rampart:property>
     <rampart:property name="java.security.auth.login.config">jaas.conf
     </rampart:property>
     <rampart:property name="javax.security.auth.useSubjectCredsOnly">true</rampart:property>
     <rampart:property name="kdc.des.aes.factor">4</rampart:property>
     <rampart:property name="java.security.krb5.conf">/Users/prabath/clients/org.wso2.identity.esb.kerberos/krb.conf
     </rampart:property>
    </rampart:kerberosConfig>
This is the security policy of the client and we have to set the path to jaas.conf and the absolute path to the krb.conf - at the same time we need to set the username and password of the client who invokes this - and this account should be in the Active Directory.

Also make a note of, service.principal.name - this is the SPN of the account where the Kerberos service is running under - we set this up in my previous blog post

6. In the KerberosCLient code set the RELYING_PARTY_SERVICE_EPR to you WCF Service EPR http://192.168.2.10/EchoServices/EchoService.svc

7. That's it :)

Kerberos authentication with WCF Service and WCF Client

1.Environment Setup

- Required Windows 2008 Server + IIS 7 + Active Directory + Visual Studio 2008

1.1 Active Directory

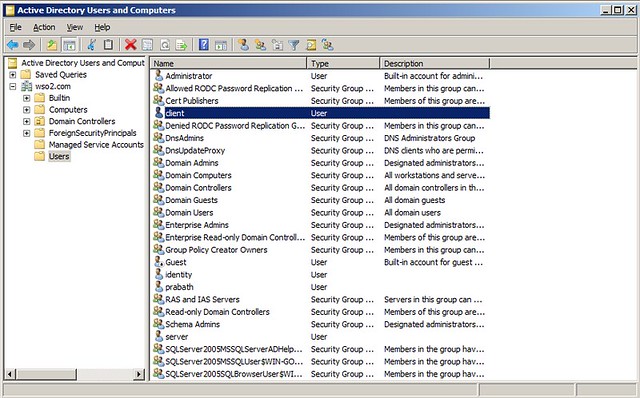
Following image shows my Active Directory configuration which includes two users server and client


Open up a command window and type the following to set the SPN for the user 'server'
:\> setspn -A service/myserver server

1.2 IIS

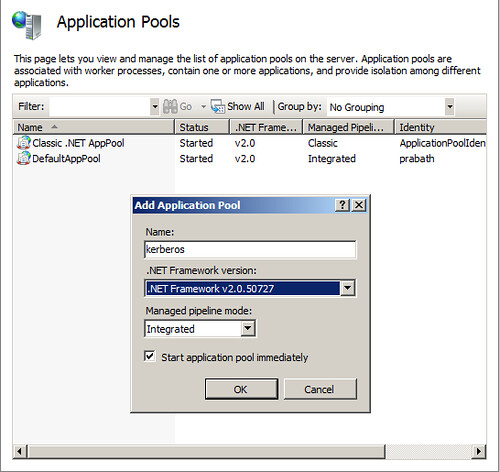
Open up IIS and create an application pool called 'kerberos'


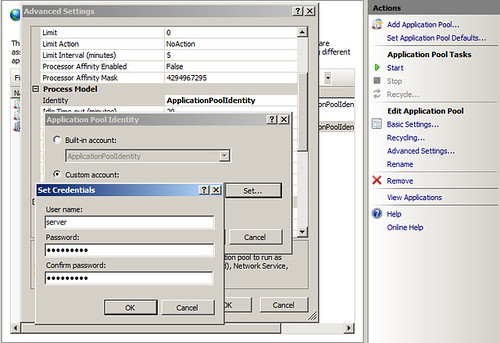
Then Edit the Advance Settings of the created application pool --> Select 'Identity' (under Process Model) --> Select 'Custom Account' --> set the user 'server' and his password


2.Sample Setup

2.1 Download the sample zip file from here, unzip and open it up in Visual Studio 2008

2.2 Find the following setting in web.config unser EchoService project and change it appropriately.. Here service/myserver is the SPN you create before for the user server.
<identity> 
<serviceprincipalname value="service/myserver" /> 
</identity> 
2.3 Build the entire solution

2.4 Deploy the service in IIS with the EchoService.WebSetup project

2.5 While doing 2.4, select the application pool created before in IIS - that is 'Kerberos'

2.6 Make sure the service running properly by accessing it's WSDL

http://localhost/EchoServices/EchoService.svc?wsdl

2.7 Open up the app.config file under EchoClient project and edit the following configuration appropriately..
<identity> 
<serviceprincipalname value="service/myserver" /> 
</identity> 
2.8 Correct the End Point address in app.config to point to the deployed service

That's it - now you can run the client from the IDE by setting it as the startup project.

How to fetch HTTPS end point certificate chain via Shell ?

You can do it through the web browser - and download each and every certificate...

Following is the easy way via shell..
$ openssl s_client -showcerts  -connect www.amazon.com:443 > ssl.log

depth=1 C = US, O = "VeriSign, Inc.", OU = VeriSign Trust Network, OU = Terms of use at https://www.verisign.com/rpa (c)09, CN = VeriSign Class 3 Secure Server CA - G2
verify error:num=20:unable to get local issuer certificate
verify return:0

CtrL+C

$ sed -n  '/-----BEGIN CERTIFICATE-----/,/-----END CERTIFICATE-----/p' ssl.log  > cert.pem
The above will save the certificate chain corresponding to www.amazon.com in cert.pem file.
-----BEGIN CERTIFICATE-----
MIIE9jCCA96gAwIBAgIQJfXRLV5vC9Tq8qLJZvO0zjANBgkqhkiG9w0BAQUFADCB
tTELMAkGA1UEBhMCVVMxFzAVBgNVBAoTDlZlcmlTaWduLCBJbmMuMR8wHQYDVQQL
ExZWZXJpU2lnbiBUcnVzdCBOZXR3b3JrMTswOQYDVQQLEzJUZXJtcyBvZiB1c2Ug
YXQgaHR0cHM6Ly93d3cudmVyaXNpZ24uY29tL3JwYSAoYykwOTEvMC0GA1UEAxMm
VmVyaVNpZ24gQ2xhc3MgMyBTZWN1cmUgU2VydmVyIENBIC0gRzIwHhcNMTAwNzE1
MDAwMDAwWhcNMTMwNzE0MjM1OTU5WjBnMQswCQYDVQQGEwJVUzETMBEGA1UECBMK
V2FzaGluZ3RvbjEQMA4GA1UEBxQHU2VhdHRsZTEYMBYGA1UEChQPQW1hem9uLmNv
bSBJbmMuMRcwFQYDVQQDFA53d3cuYW1hem9uLmNvbTCBnzANBgkqhkiG9w0BAQEF
AAOBjQAwgYkCgYEAvokOoa36fVhqoWrkO+115D7yGffzD/rZ72IQUnv83ZSWqDVr
G1BgLi55rHwuo4HejTf57m5PgsfkEgRVr1dplIzvLlB6bVMPW19iWF7P8t/0Tc5x
toLXhuVPd+SRquS9WmWqniBPOF60i+A2RYCo1SRcRp3xgMBrYqUfJl6uF0cCAwEA
AaOCAdEwggHNMAkGA1UdEwQCMAAwCwYDVR0PBAQDAgWgMEUGA1UdHwQ+MDwwOqA4
oDaGNGh0dHA6Ly9TVlJTZWN1cmUtRzItY3JsLnZlcmlzaWduLmNvbS9TVlJTZWN1
cmVHMi5jcmwwRAYDVR0gBD0wOzA5BgtghkgBhvhFAQcXAzAqMCgGCCsGAQUFBwIB
FhxodHRwczovL3d3dy52ZXJpc2lnbi5jb20vcnBhMB0GA1UdJQQWMBQGCCsGAQUF
BwMBBggrBgEFBQcDAjAfBgNVHSMEGDAWgBSl7wsRzsBBA6NKZZBIshzgVy19RzB2
BggrBgEFBQcBAQRqMGgwJAYIKwYBBQUHMAGGGGh0dHA6Ly9vY3NwLnZlcmlzaWdu
LmNvbTBABggrBgEFBQcwAoY0aHR0cDovL1NWUlNlY3VyZS1HMi1haWEudmVyaXNp
Z24uY29tL1NWUlNlY3VyZUcyLmNlcjBuBggrBgEFBQcBDARiMGChXqBcMFowWDBW
FglpbWFnZS9naWYwITAfMAcGBSsOAwIaBBRLa7kolgYMu9BSOJsprEsHiyEFGDAm
FiRodHRwOi8vbG9nby52ZXJpc2lnbi5jb20vdnNsb2dvMS5naWYwDQYJKoZIhvcN
AQEFBQADggEBAKgV/fW6WoiZDCo9KLt0gmU/QkchH9R41k2etuwXzRi3nvmD5ek5
io/dPGHXwOvxcjTkTz/nM0CpSZ9EsI2/M7F2laNQIY+PDB5ggl4gmPq/GTMaEqFh
YT+oXLiAmqA03N1SjJiFum3OvOBMqZs4xU1WELrvcoobCGh73VlD5TMbCj+9QyrL
7jQ2Q9Vp18p6g6mr5hXvlOiVZSv2nhFOXw4ZAXahMDYGUvEJ4M/UcRYNgLoSJp6T
Sxxfg0ws0Gk7xZkxxEyPJ75JmqwhPkpd4RjTOURiBBbazNjtPYjSpuOub+sTr/Ft
ftICSDU8L5qg9bxV6qR7it5iC3OcWEEcLFE=
-----END CERTIFICATE-----
-----BEGIN CERTIFICATE-----
MIIGLDCCBZWgAwIBAgIQbk/6s8XmacTRZ8mSq+hYxDANBgkqhkiG9w0BAQUFADCB
wTELMAkGA1UEBhMCVVMxFzAVBgNVBAoTDlZlcmlTaWduLCBJbmMuMTwwOgYDVQQL
EzNDbGFzcyAzIFB1YmxpYyBQcmltYXJ5IENlcnRpZmljYXRpb24gQXV0aG9yaXR5
IC0gRzIxOjA4BgNVBAsTMShjKSAxOTk4IFZlcmlTaWduLCBJbmMuIC0gRm9yIGF1
dGhvcml6ZWQgdXNlIG9ubHkxHzAdBgNVBAsTFlZlcmlTaWduIFRydXN0IE5ldHdv
cmswHhcNMDkwMzI1MDAwMDAwWhcNMTkwMzI0MjM1OTU5WjCBtTELMAkGA1UEBhMC
VVMxFzAVBgNVBAoTDlZlcmlTaWduLCBJbmMuMR8wHQYDVQQLExZWZXJpU2lnbiBU
cnVzdCBOZXR3b3JrMTswOQYDVQQLEzJUZXJtcyBvZiB1c2UgYXQgaHR0cHM6Ly93
d3cudmVyaXNpZ24uY29tL3JwYSAoYykwOTEvMC0GA1UEAxMmVmVyaVNpZ24gQ2xh
c3MgMyBTZWN1cmUgU2VydmVyIENBIC0gRzIwggEiMA0GCSqGSIb3DQEBAQUAA4IB
DwAwggEKAoIBAQDUVo9XOzcopkBj0pXVBXTatRlqltZxVy/iwDSMoJWzjOE3JPMu
7UNFBY6J1/raSrX4Po1Ox/lJUEU3QJ90qqBRVWHxYISJpZ6AjS+wIapFgsTPtBR/
RxUgKIKwaBLArlwH1/ZZzMtiVlxNSf8miKtUUTovStoOmOKJcrn892g8xB85essX
gfMMrQ/cYWIbEAsEHikYcV5iy0PevjG6cQIZTiapUdqMZGkD3pz9ff17Ybz8hHyI
XLTDe+1fK0YS8f0AAZqLW+mjBS6PLlve8xt4+GaRCMBeztWwNsrUqHugffkwer/4
3RlRKyC6/qfPoU6wZ/WAqiuDLtKOVImOHikLAgMBAAGjggKpMIICpTA0BggrBgEF
BQcBAQQoMCYwJAYIKwYBBQUHMAGGGGh0dHA6Ly9vY3NwLnZlcmlzaWduLmNvbTAS
BgNVHRMBAf8ECDAGAQH/AgEAMHAGA1UdIARpMGcwZQYLYIZIAYb4RQEHFwMwVjAo
BggrBgEFBQcCARYcaHR0cHM6Ly93d3cudmVyaXNpZ24uY29tL2NwczAqBggrBgEF
BQcCAjAeGhxodHRwczovL3d3dy52ZXJpc2lnbi5jb20vcnBhMDQGA1UdHwQtMCsw
KaAnoCWGI2h0dHA6Ly9jcmwudmVyaXNpZ24uY29tL3BjYTMtZzIuY3JsMA4GA1Ud
DwEB/wQEAwIBBjBtBggrBgEFBQcBDARhMF+hXaBbMFkwVzBVFglpbWFnZS9naWYw
ITAfMAcGBSsOAwIaBBSP5dMahqyNjmvDz4Bq1EgYLHsZLjAlFiNodHRwOi8vbG9n
by52ZXJpc2lnbi5jb20vdnNsb2dvLmdpZjApBgNVHREEIjAgpB4wHDEaMBgGA1UE
AxMRQ2xhc3MzQ0EyMDQ4LTEtNTIwHQYDVR0OBBYEFKXvCxHOwEEDo0plkEiyHOBX
LX1HMIHnBgNVHSMEgd8wgdyhgcekgcQwgcExCzAJBgNVBAYTAlVTMRcwFQYDVQQK
Ew5WZXJpU2lnbiwgSW5jLjE8MDoGA1UECxMzQ2xhc3MgMyBQdWJsaWMgUHJpbWFy
eSBDZXJ0aWZpY2F0aW9uIEF1dGhvcml0eSAtIEcyMTowOAYDVQQLEzEoYykgMTk5
OCBWZXJpU2lnbiwgSW5jLiAtIEZvciBhdXRob3JpemVkIHVzZSBvbmx5MR8wHQYD
VQQLExZWZXJpU2lnbiBUcnVzdCBOZXR3b3JrghB92f4Hz6getxB5Z/uniTTGMA0G
CSqGSIb3DQEBBQUAA4GBAGN0Lz1Tqi+X7CYRZhr+8d5BJxnSf9jBHPniOFY6H5Cu
OcUgdav4bC1nHynCIdcUiGNLsJsnY5H48KMBJLb7j+M9AgtvVP7UzNvWhb98lR5e
YhHB2QmcQrmy1KotmDojYMyimvFu6M+O0Ro8XhnF15s1sAIjJOUFuNWI4+D6ufRf
-----END CERTIFICATE-----

Curl with HTTPS

Wrote a blog sometime back on "How to invoke a web service call with curl ?" in RampartFAQ.com - but that doesn't explain how to work with Curl with HTTPS.

Today morning I got a question from one of my colleagues and thought of writing a blog on the $subject in detail..

Let's go with few examples..

1. Invoke https://www.amazon.com
$ curl https://www.amazon.com
<!DOCTYPE HTML PUBLIC "-//IETF//DTD HTML 2.0//EN">
<html><head>
<title>301 Moved Permanently</title>
</head><body>
<h1>Moved Permanently</h1>
<p>The document has moved <a href="http://www.amazon.com/">here</a>.</p>
</body></html>
2. Above won't print details about the SSL handshake. To view SSL handshake let's use -v as an argument
$ curl -v https://www.amazon.com
* About to connect() to www.amazon.com port 443 (#0)
*   Trying 72.21.214.128... connected
* Connected to www.amazon.com (72.21.214.128) port 443 (#0)
* successfully set certificate verify locations:
*   CAfile: /opt/local/share/curl/curl-ca-bundle.crt
  CApath: none
* SSLv3, TLS handshake, Client hello (1):
* SSLv3, TLS handshake, Server hello (2):
* SSLv3, TLS handshake, CERT (11):
* SSLv3, TLS handshake, Server finished (14):
* SSLv3, TLS handshake, Client key exchange (16):
* SSLv3, TLS change cipher, Client hello (1):
* SSLv3, TLS handshake, Finished (20):
* SSLv3, TLS change cipher, Client hello (1):
* SSLv3, TLS handshake, Finished (20):
* SSL connection using RC4-MD5
* Server certificate:
*   subject: C=US; ST=Washington; L=Seattle; O=Amazon.com Inc.; CN=www.amazon.com
*   start date: 2010-07-15 00:00:00 GMT
*   expire date: 2013-07-14 23:59:59 GMT
*   common name: www.amazon.com (matched)
*   issuer: C=US; O=VeriSign, Inc.; OU=VeriSign Trust Network; OU=Terms of use at https://www.verisign.com/rpa (c)09; CN=VeriSign Class 3 Secure Server CA - G2
*   SSL certificate verify ok.
> GET / HTTP/1.1
> User-Agent: curl/7.21.2 (x86_64-apple-darwin10.5.0) libcurl/7.21.2 OpenSSL/1.0.0b zlib/1.2.5 libidn/1.19
> Host: www.amazon.com
> Accept: */*
> 
< HTTP/1.1 301 Moved Permanently
< Date: Thu, 02 Dec 2010 07:22:22 GMT
< Server: Server
< Set-Cookie: skin=noskin; path=/; domain=.amazon.com; expires=Thu, 02-Dec-2010 07:22:22 GMT
< Location: http://www.amazon.com/
< Content-Length: 230
< nnCoection: close
< Content-Type: text/html; charset=iso-8859-1
< 
<!DOCTYPE HTML PUBLIC "-//IETF//DTD HTML 2.0//EN">
<html><head>
<title>301 Moved Permanently</title>
</head><body>
<h1>Moved Permanently</h1>
<p>The document has moved <a href="http://www.amazon.com/">here</a>.</p>
</body></html>
* Connection #0 to host www.amazon.com left intact
* Closing connection #0
* SSLv3, TLS alert, Client hello (1):
This HTTPS connection works fine, because, the client trusts the CA of the Amazon's SSL certificate.

By going through the logs you will see, the CA certificates are verified against the curl-ca-bundle.crt file located at /opt/local/share/curl/curl-ca-bundle.crt

If you have a look at the above file, you will see all the trusted CAs listed there..
Verisign Class 1 Public Primary Certification Authority
=======================================================
-----BEGIN CERTIFICATE-----
MIICPDCCAaUCED9pHoGc8JpK83P/uUii5N0wDQYJKoZIhvcNAQEFBQAwXzELMAkGA1UEBhMCVVMx
FzAVBgNVBAoTDlZlcmlTaWduLCBJbmMuMTcwNQYDVQQLEy5DbGFzcyAxIFB1YmxpYyBQcmltYXJ5
IENlcnRpZmljYXRpb24gQXV0aG9yaXR5MB4XDTk2MDEyOTAwMDAwMFoXDTI4MDgwMjIzNTk1OVow
XzELMAkGA1UEBhMCVVMxFzAVBgNVBAoTDlZlcmlTaWduLCBJbmMuMTcwNQYDVQQLEy5DbGFzcyAx
IFB1YmxpYyBQcmltYXJ5IENlcnRpZmljYXRpb24gQXV0aG9yaXR5MIGfMA0GCSqGSIb3DQEBAQUA
A4GNADCBiQKBgQDlGb9to1ZhLZlIcfZn3rmN67eehoAKkQ76OCWvRoiC5XOooJskXQ0fzGVuDLDQ
VoQYh5oGmxChc9+0WDlrbsH2FdWoqD+qEgaNMax/sDTXjzRniAnNFBHiTkVWaR94AoDa3EeRKbs2
yWNcxeDXLYd7obcysHswuiovMaruo2fa2wIDAQABMA0GCSqGSIb3DQEBBQUAA4GBAFgVKTk8d6Pa
XCUDfGD67gmZPCcQcMgMCeazh88K4hiWNWLMv5sneYlfycQJ9M61Hd8qveXbhpxoJeUwfLaJFf5n
0a3hUKw8fGJLj7qE1xIVGx/KXQ/BUpQqEZnae88MNhPVNdwQGVnqlMEAv3WP2fr9dgTbYruQagPZ
RjXZ+Hxb
-----END CERTIFICATE-----

Verisign Class 3 Public Primary Certification Authority
=======================================================
-----BEGIN CERTIFICATE-----
MIICPDCCAaUCEDyRMcsf9tAbDpq40ES/Er4wDQYJKoZIhvcNAQEFBQAwXzELMAkGA1UEBhMCVVMx
FzAVBgNVBAoTDlZlcmlTaWduLCBJbmMuMTcwNQYDVQQLEy5DbGFzcyAzIFB1YmxpYyBQcmltYXJ5
IENlcnRpZmljYXRpb24gQXV0aG9yaXR5MB4XDTk2MDEyOTAwMDAwMFoXDTI4MDgwMjIzNTk1OVow
XzELMAkGA1UEBhMCVVMxFzAVBgNVBAoTDlZlcmlTaWduLCBJbmMuMTcwNQYDVQQLEy5DbGFzcyAz
IFB1YmxpYyBQcmltYXJ5IENlcnRpZmljYXRpb24gQXV0aG9yaXR5MIGfMA0GCSqGSIb3DQEBAQUA
A4GNADCBiQKBgQDJXFme8huKARS0EN8EQNvjV69qRUCPhAwL0TPZ2RHP7gJYHyX3KqhEBarsAx94
f56TuZoAqiN91qyFomNFx3InzPRMxnVx0jnvT0Lwdd8KkMaOIG+YD/isI19wKTakyYbnsZogy1Ol
hec9vn2a/iRFM9x2Fe0PonFkTGUugWhFpwIDAQABMA0GCSqGSIb3DQEBBQUAA4GBABByUqkFFBky
CEHwxWsKzH4PIRnN5GfcX6kb5sroc50i2JhucwNhkcV8sEVAbkSdjbCxlnRhLQ2pRdKkkirWmnWX
bj9T/UWZYB2oK0z5XqcJ2HUw19JlYD1n1khVdWk/kfVIC0dpImmClr7JyDiGSnoscxlIaU5rfGW/
D/xwzoiQ
-----END CERTIFICATE-----
In the case of Amazon, it's Verisign who the CA is..

3. Let's try to invoke https://amazon.com [Not www.amazon.com]
$ curl -v https://amazon.com
* About to connect() to amazon.com port 443 (#0)
*   Trying 72.21.210.250... connected
* Connected to amazon.com (72.21.210.250) port 443 (#0)
* successfully set certificate verify locations:
*   CAfile: /opt/local/share/curl/curl-ca-bundle.crt
  CApath: none
* SSLv3, TLS handshake, Client hello (1):
* SSLv3, TLS handshake, Server hello (2):
* SSLv3, TLS handshake, CERT (11):
* SSLv3, TLS handshake, Server finished (14):
* SSLv3, TLS handshake, Client key exchange (16):
* SSLv3, TLS change cipher, Client hello (1):
* SSLv3, TLS handshake, Finished (20):
* SSLv3, TLS change cipher, Client hello (1):
* SSLv3, TLS handshake, Finished (20):
* SSL connection using RC4-MD5
* Server certificate:
*   subject: C=US; ST=Washington; L=Seattle; O=Amazon.com Inc.; CN=www.amazon.com
*   start date: 2010-07-15 00:00:00 GMT
*   expire date: 2013-07-14 23:59:59 GMT
* SSL: certificate subject name 'www.amazon.com' does not match target host name 'amazon.com'
* Closing connection #0
* SSLv3, TLS alert, Client hello (1):
curl: (51) SSL: certificate subject name 'www.amazon.com' does not match target host name 'amazon.com'
This fails.. Why ? It's the same CA which is trusted by the Curl client - but it fails due to the host name verification. The certificate was issued to www.amazon.com - not for amazon.com

4. Let's try to invoke https://amazon.com [Not www.amazon.com] - by disabling SSL validations with the argument -k
curl -v -k https://amazon.com
* About to connect() to amazon.com port 443 (#0)
*   Trying 72.21.210.250... connected
* Connected to amazon.com (72.21.210.250) port 443 (#0)
* successfully set certificate verify locations:
*   CAfile: /opt/local/share/curl/curl-ca-bundle.crt
  CApath: none
* SSLv3, TLS handshake, Client hello (1):
* SSLv3, TLS handshake, Server hello (2):
* SSLv3, TLS handshake, CERT (11):
* SSLv3, TLS handshake, Server finished (14):
* SSLv3, TLS handshake, Client key exchange (16):
* SSLv3, TLS change cipher, Client hello (1):
* SSLv3, TLS handshake, Finished (20):
* SSLv3, TLS change cipher, Client hello (1):
* SSLv3, TLS handshake, Finished (20):
* SSL connection using RC4-MD5
* Server certificate:
*   subject: C=US; ST=Washington; L=Seattle; O=Amazon.com Inc.; CN=www.amazon.com
*   start date: 2010-07-15 00:00:00 GMT
*   expire date: 2013-07-14 23:59:59 GMT
*   common name: www.amazon.com (does not match 'amazon.com')
*   issuer: C=US; O=VeriSign, Inc.; OU=VeriSign Trust Network; OU=Terms of use at https://www.verisign.com/rpa (c)09; CN=VeriSign Class 3 Secure Server CA - G2
*   SSL certificate verify ok.
> GET / HTTP/1.1
> User-Agent: curl/7.21.2 (x86_64-apple-darwin10.5.0) libcurl/7.21.2 OpenSSL/1.0.0b zlib/1.2.5 libidn/1.19
> Host: amazon.com
> Accept: */*
> 
< HTTP/1.1 301 Moved Permanently
< Date: Thu, 02 Dec 2010 07:38:04 GMT
< Server: Server
< Location: https://www.amazon.com/
< Content-Length: 231
< Cneonction: close
< Content-Type: text/html; charset=iso-8859-1
< 
<!DOCTYPE HTML PUBLIC "-//IETF//DTD HTML 2.0//EN">
<html><head>
<title>301 Moved Permanently</title>
</head><body>
<h1>Moved Permanently</h1>
<p>The document has moved <a href="https://www.amazon.com/">here</a>.</p>
</body></html>
* Connection #0 to host amazon.com left intact
* Closing connection #0
* SSLv3, TLS alert, Client hello (1):
This succeeds.. since we asked Curl to ignore SSL validation issues..

5. Let's try to invoke a service with a certificate issued from a CA not trusted by Curl. I am using WSO2 ESB here - which ships with a self-signed certificate - so, obviously not trusted by Curl
$ curl -v https://localhost:9447/carbon
* About to connect() to localhost port 9447 (#0)
*   Trying ::1... connected
* Connected to localhost (::1) port 9447 (#0)
* successfully set certificate verify locations:
*   CAfile: /opt/local/share/curl/curl-ca-bundle.crt
  CApath: none
* SSLv3, TLS handshake, Client hello (1):
* SSLv3, TLS handshake, Server hello (2):
* SSLv3, TLS handshake, CERT (11):
* SSLv3, TLS alert, Server hello (2):
* SSL certificate problem, verify that the CA cert is OK. Details:
error:14090086:SSL routines:SSL3_GET_SERVER_CERTIFICATE:certificate verify failed
* Closing connection #0
curl: (60) SSL certificate problem, verify that the CA cert is OK. Details:
error:14090086:SSL routines:SSL3_GET_SERVER_CERTIFICATE:certificate verify failed
More details here: http://curl.haxx.se/docs/sslcerts.html
You will see, above fails since server certification is not trusted.

6. Let's improve step-5 - by asking Curl to trust our CA certificate.
$ curl -v --cacert esbcert.pem  https://localhost:9447/carbon
Here we specify CA certificate of the ESB - with the argument --cacert

Notes :

1. To find the path of the trusted CA bundle

$ curl-config --ca

2. To set your own trusted CA bundle

$ export CURL_CA_BUNDLE=my-ca-bundle.crt
Hand-crafting TCP/IP handshake with Scapy

The following video explains TCP/IP 3-way handshake - and later we are going to hand-craft the packets used in TCP/IP handshake with Scapy.


First lets define the server and the client,

Server : 192.168.2.1
Client : 192.168.2.11

First I will start Scapy at the client side, to track the packets flowing in between client and the server
$ sudo scapy

>>> a=sniff(filter="tcp")
Now lets open up another console in the client end and start Scapy again..
$ sudo scapy
Welcome to Scapy (2.1.0)
>>>
Step - 1

Now, first create an IP packet - you may notice the src is set to the client IP and the dst been set to the server IP.
>>> ip=IP(src="192.168.2.11", dst="192.168.2.1")
Then, we need to create a TCP packet with SYN - see the flags been set to "S". And we are also setting a sequence number...

Step - 2
>>> SYN=TCP(sport=1500, dport=80, flags="S", seq=100)
Then we need to send the crafted packet. With this we are expecting SYN ACK from the server.

Step - 3
>>> SYNACK=sr1(ip/SYN)
But, if you press Ctrl+C and then a.nsummary() on the other console we are running Scapy, you will see an RST been sent from the client after the SYN.
$ sudo scapy
>>> a=sniff(filter="tcp")
Ctrl+C
>>>a.nsummary()
0000 Ether / IP / TCP 192.168.2.11:1500 > 192.168.2.1:www S
0001 Ether / IP / TCP 192.168.2.11:1500 > 192.168.2.1:www R
Linux kernel automatically sets appropriate header values and knows how to complete a TCP 3 way handshake.

Scapy does not use these kernel services. It creates a raw socket.

In the previous case, as soon as the kernel sees the SYN/ACK it responded with a RST - because it did not send the SYN [it was through Scapy].

So, we need to avoid this behavior and this is how we do it. We can use iptables on our host to suppress outbound RSTs to the destination we are working with.

sudo iptables -A OUTPUT -p tcp --tcp-flags RST RST -s 192.168.2.11 -dport 1500 -j DROP

Once the above done performs steps 1 to 3 and you won't see an RST been sent from the client.

Step - 4

Now the client needs to send ACK for the server's SYN.

Here you will see the sequence number is increased by one and the the sequence number from the SYN ACK form the server been set as the ack.
>>> ACK=TCP(sport=1500, dport=80, flags="S", seq=101 ack=SYNACK.seq)
Step - 5

Send the client ACK to the server
>>>send(ip/ACK)
Step - 6

Let's go back to the first console window and view the flow between client and the server
$ sudo scapy
>>> a=sniff(filter="tcp")
Ctrl+C
>>>a.nsummary()
0000 Ether / IP / TCP 192.168.2.11:1500 > 192.168.2.1:www S
0001 Ether / IP / TCP 192.168.2.1:www > 192.168.2.11:1500 SA
0002 Ether / IP / TCP 192.168.2.11:1500 > 192.168.2.1:www A